What is Django?
Django is an open-source Python web framework used to create complex back-end applications for the web. To work with Django you will need a good working knowledge of databases, Python, HTML and CSS.
Django Key Features:
- Versatile: You can use Django to build various applications like content management systems (CMS), social networking sites, and even scientific computing platforms
- Batteries Included: Bundles many useful features outs of the box, including a caching framework with Memcached, content admin, site maps, RSS, authentication, and more
- Portable: Because Django is written in Python, it is portable and can operate on any platform.
- Secure: Django comes with strong user authentication mechanisms and helps avert common security risks like click jacking, SQL injection, cross-site scripting, and more.
- Scalable: Code reuse and maintenance, along with independent layers and DRY principles, allow for seamless scalability.
MVT Architecture:
- The Django framework uses a Model, View, and Template (MVT) approach, which is a little modification on the MVC technique.
- Similarly, the model serves as the application's data layer.
- The view is, in reality, the layer that handles the processing logic. The template is the presentation layer.
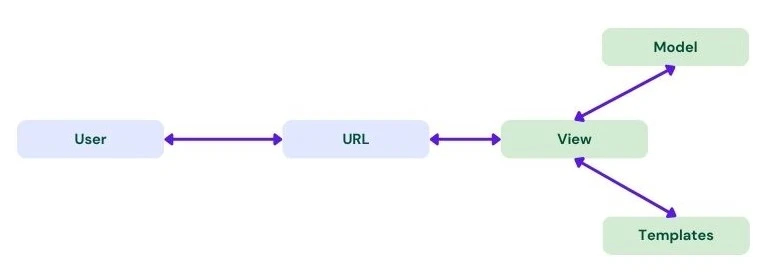
The elements of a Django application are as follows:
- URL dispatcher
- View
- Model
- Template
What is Flask?
Flask was created to test the integration of the Jinja2 template library with the Werkzeug WSGI (Web Server Gateway Interface) toolkit. Flask is now a complete framework that is extendable and light, and it doesn't use a "batteries included" methodology. This implies that developers won't have to carry around extra weight when looking for the extensions or plugins they require.
Flask Key Features:
- Lightweight and extensible: Developers have full control over application architecture, libraries, and extensions, with a user-friendly API.
- Adaptable: Easy to use with any working style, suitable for experienced developers.
- Request Handling: Supports HTTP and RESTful requests
- Testing and troubleshooting: Integrated unit testing and debugger provide efficient troubleshooting and development.
- Secure Cookies: HTTP request characteristics offer security and prevent unauthorized access.
- Flexible and scalable: Support for WSGI templates enables flexibility and scalability.
When to Use Flask vs Django?
Use Django when you need:
- Work on large projects (multi-page)
- Use built-in features and gain access support to speed up development
- Build secure projects that require authorization
- Have the option to scale up or make projects more complex in the future
- Create web applications with native ORM support or API backends
Use Flask when you need:
- Work on smaller projects (single-page)
- Have varied database support, including NoSQL
- Have flexibility and freedom to choose libraries and extensions
- Have API support or want to add new extensions in the future
- Create static websites, rapid prototypes, and RESTful web services
Step-by-step guide for migrating from Flask to Django:
Setting Up Your Django Project:
Now that you have a plan in place, it's time to create your Django project. Follow these steps:
Prerequisites:
Before we begin, make sure you have Python and pip (Python package manager) installed on your system. You can download them from the official Python website if you haven't already.
Step 1: Install 'Virtualenv'
Install virtualenv, a tool that helps you create and manage virtual environments. Open your terminal and run:
pip install virtualenv
Step 2: Create a Project Directory
Navigate to the directory where you want to create your Django project. Use the mkdir command to create a directory for your project. For example:
mkdir my_django_project
Then, navigate to the newly created directory:
cd my_django_project
Step 3: Create a virtual Environment
Inside your project directory, create a virtual environment using the virtualenv command. You can name your virtual environment whatever you like, but "env" is a common choice:
virtualenv env
This command will create a folder named "env" in your project directory, containing an isolated Python environment.
Step 4: Activate the Virtual Environment
Now, you need to activate the virtual environment.
env\\Scripts\\activate
When the virtual environment is activated, you'll notice your terminal prompt changes to indicate that you are now working within the virtual environment.
Step 5: Install Django
After the virtual environment gets activated, you can install Django using pip:
pip install django
The above command will install Django within your virtual environment, ensuring that it doesn't affect your system's local Python installation.
Step 6: Create a Django Project
Now you can create a new Django project. Run the following command:
django-admin startproject projectname
Step 7: Running Your Django Project
You can now run your Django project within the virtual environment. Navigate into your project directory and run the development server:
cd projectname
python manage.py runserver
Your Django development server should now be up and running. Open your web browser and access the URL provided by the development server (usually http://localhost:8000/), and you'll see the Django "Welcome" page.
Step 8: Deactivating the Virtual Environment
When you're done working on your project, you can deactivate the virtual environment by running:
deactivate
Your terminal prompt will return to its normal state, indicating that you've exited the virtual environment.
Step 9: Define Models
Create Django models for your data. Define these models in the models.py file of your app. You can use Django's Object-Relational Mapping (ORM) to define your data structures.
Step 10: Migrate Data
If you have an existing database, you can use Django's migration tools to generate database tables from your models:
python manage.py makemigrations
python manage.py migrate
Step 11: Transfer Views and Templates
Rewrite your Flask views as Django views within your app's views.py file. Also, update your templates using Django's template system. You may need to change the template syntax.
Step 12: Configure Database
Configuring the database settings in Django's settings.py file. Here's an example of how your database configuration might look like:
DATABASES = {
'default': {
'ENGINE': 'django.db.backends.oracle',
'NAME': 'your_database_name',
'USER': 'your_database_user',
'PASSWORD': 'your_database_password',
'HOST': 'localhost', # or the IP address of your database server
'PORT': '1521', # or the appropriate port number
},
}
-
'ENGINE': The database engine you're using. In your case, you've specified 'django.db.backends.oracle' for Oracle Database.
-
'NAME': The name of the database you want to connect to.
-
'USER': The username for the database.
-
'PASSWORD': The password for the database user.
-
'HOST': The hostname or IP address where the database server is running. If it's on the same machine, you can use 'localhost'.
-
'PORT': The port number on which the database server is listening. The default port for Oracle Database is usually 1521.
Step 13: Configure URLs
Create URL patterns for your views in the urls.py file within your app. Map your old Flask routes to their corresponding Django views. Here's an example for urls.py file might look like:
from django.urls import path
from . import views
urlpatterns = [
path('testpagemaster/', views.testpagemaster, name='testpagemaster'),
]
Step 14: Static and Media Files
Configure Django to serve static files (CSS, JavaScript, etc.) and media files (user-uploaded content). Update your settings in the settings.py file. Here's an example for the settings.py file might look like:
STATIC_URL = '/static/'
STATICFILES_DIRS = [os.path.join(BASE_DIR, 'static')]
Testing: Create tests for your Django application to confirm that it functions properly. Django offers powerful testing tools.
Deployment: Customise your deployment procedure to meet Django's requirements. You might need to utilize a WSGI server, such as Gunicorn. Update your server's settings accordingly.
Set up logging and monitoring for your Django application with Django's logging framework and monitoring capabilities.
Optimization: Improve your code and database queries as necessary. Django has query optimization tools, and you may use caching techniques to boost speed.
This guide outlines the major steps involved in migrating from Flask to Django. Remember that the migration process may vary depending on the complexity of your Flask application, so adapt these steps as needed. Thorough planning and testing are crucial to ensure a successful migration.
